
Joy and Alec were married in November 2008 and were ready to do something fantastic with their professional wedding photos :) Joy mailed me 86 photos in various sizes (taken by
Whitney Lee Photography in Austin, Texas) and asked me to make a classic but rad album using their wedding colors and a simple, beautiful design :)

Joy and Alec are so full of love & cuteness and their Wedding looks like it was SO fun! Kazoo's, board game center pieces, and a really ugly cake they threw in the dumpster (lol, easily a great
photo opp that made it into their Wedding Album).
Joy, I've loved getting to know you thru the design process...your name couldn't be more perfect for you :] Thank you Joy & Alec,
Enjoy :)


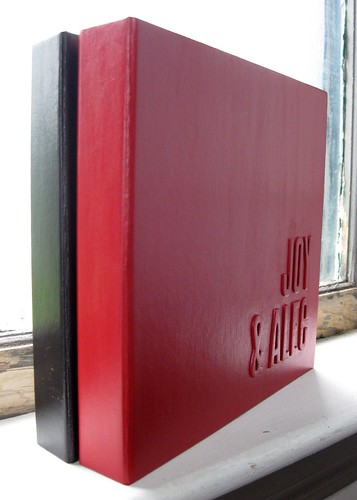
Joy and Alec also sent me pieces of their handmade tablecloth/backdrop to incorporate in the album. I used the red lace and b&w zebra paper as the skin inside the album :)

After Joy saw
Chloe & Sean's album, she remembered a Q&A her and Alec had done and asked for it to be included in the album. While I typed their questions and answers with my little red typewriter, Lola barked so much, it was hilarious ;)
 Full Set HERE :)

I save this step for last, and each time, it's so exciting to put my seal and the album number... I'm kinda a dork about it :)
 Tutorial: How to Make this Cover
I learned this album cover technique from Ali Edwards at Artistry in Vancouver a few years ago.
 1.
1. Use raw chipboard letters (pre-sticky works best) and stick your title onto a cardboard album cover or panel. Press them down good. I used
this technique to line them up nicely :)
 TIP:
TIP: If your letters have a colored/smooth surface (like my 22), sand the gloss off with a nail file.
 2.
2. Paint the album and letters the same color with acrylic paint. Get in the crevices, and do 2 or 3 coats, letting each dry in between.

 TIP:
TIP: For the red album, I poured squirted paint directly on the album and spread it out... But I found it worked better (and didn't dry blobby on the album) to use a paint plate & dip my brush instead.
 3.
3. After your coats are dry and solid, give your album a coat of Matte Modge Podge. Let dry, then do one more coat. It works best to apply the modge podge in sections and all in one direction.
 Also, I'm working on a new little kit... i will premiere it on Monday, eeek :)
XO! LA :)
Also, I'm working on a new little kit... i will premiere it on Monday, eeek :)
XO! LA :)

 Joy and Alec were married in November 2008 and were ready to do something fantastic with their professional wedding photos :) Joy mailed me 86 photos in various sizes (taken by Whitney Lee Photography in Austin, Texas) and asked me to make a classic but rad album using their wedding colors and a simple, beautiful design :)
 Joy and Alec are so full of love & cuteness and their Wedding looks like it was SO fun! Kazoo's, board game center pieces, and a really ugly cake they threw in the dumpster (lol, easily a great photo opp that made it into their Wedding Album). Joy, I've loved getting to know you thru the design process...your name couldn't be more perfect for you :] Thank you Joy & Alec, Enjoy :)


 Joy and Alec also sent me pieces of their handmade tablecloth/backdrop to incorporate in the album. I used the red lace and b&w zebra paper as the skin inside the album :)
 After Joy saw Chloe & Sean's album, she remembered a Q&A her and Alec had done and asked for it to be included in the album. While I typed their questions and answers with my little red typewriter, Lola barked so much, it was hilarious ;)
 Full Set HERE :)
 I save this step for last, and each time, it's so exciting to put my seal and the album number... I'm kinda a dork about it :)
 1. Use raw chipboard letters (pre-sticky works best) and stick your title onto a cardboard album cover or panel. Press them down good. I used this technique to line them up nicely :)
 TIP: If your letters have a colored/smooth surface (like my 22), sand the gloss off with a nail file.
 2. Paint the album and letters the same color with acrylic paint. Get in the crevices, and do 2 or 3 coats, letting each dry in between.

 TIP: For the red album, I poured squirted paint directly on the album and spread it out... But I found it worked better (and didn't dry blobby on the album) to use a paint plate & dip my brush instead.
 3. After your coats are dry and solid, give your album a coat of Matte Modge Podge. Let dry, then do one more coat. It works best to apply the modge podge in sections and all in one direction.
 Also, I'm working on a new little kit... i will premiere it on Monday, eeek :)
XO! LA :)
Also, I'm working on a new little kit... i will premiere it on Monday, eeek :)
XO! LA :)
oh wow, this is really cute <3 you know, if i ever get married, i will def. want you to make one for me <3
ReplyDeleteI LOVE IT!!!!!!!!!!!!
ReplyDeleteLove the albums and thanks so much for the tutorial on how you did the covers. They almost looked embossed at first look. A great idea that I will definitely use! Thanks, Leigh-Ann! :o)
ReplyDeleteLA, beautiful book and thanks for the info on making the cover-love that!
ReplyDeleteBeautiful!!!! Hope you have a great weekend, LA!!! I miss your face. =) xoxo
ReplyDeletei love how you painted the album covers! and i absolutely adore the zebra print!
ReplyDeletethis is such a wonderful tutorial! thanks so much! it looks awesome!
ReplyDelete<3katie
Beautiful! These are amazing, and totally something I would want.
ReplyDeleteOMG!!! I can't wait!!! This was such an inspiring post for me!
ReplyDeleteWow, I really like your blog. I just found it via Mod Podge Rocks.
ReplyDeleteDid you use that small brush for everything, or just for the letters?
Can't wait to try this myself. The albums look fantastic.
Oops, here's my email too:
ReplyDeletegretaisfrenchie@yahoo.com
Thanks!
Fabulous! The albums AND your name!
ReplyDeleteI think i just used that one bristle brush... the foam brush left those thin bubbles. Hope this helps :)
ReplyDeleteYour work is beautiful! Where do you get your albums?
ReplyDeleteOk, was checking back to see if you responded to my question and realized I'm supposed to leave my email :0) Oops. Where do you get your albums, specifically the one you featured today? Thanks! hmills619@hotmail.com
ReplyDeleteI have the same question as Hannah--where do you get your cardboard album covers? This is a GORGEOUS album, you did beautifully!
ReplyDeletepoisonivy(a)gmail.com
Hi Hannah & Heather,
ReplyDeleteAny chipboard albums will work well, but I think "Maya Road" brand ones offer the best selection and they're well made :)
Have fun!!
LA :)
Thank you so, so much Leigh-Ann! My boyfriend is on a two year mission for my church, and I really want to make and send him one with our memories, haha! Did you just use the eight pages included in the albums by Maya Road, or did you do your own pages?
ReplyDelete-Heather