Let's start a club!
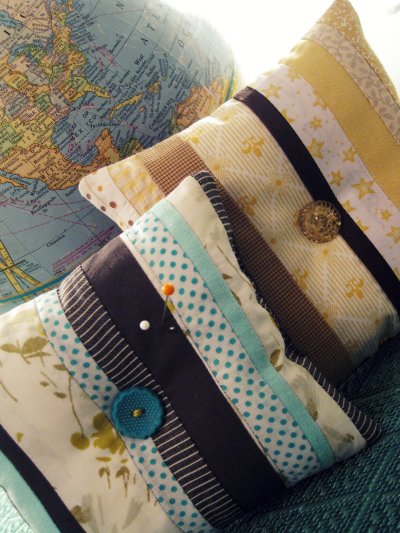
Today I wanna teach you one way to make a Pin Cushion... then we're gonna do a trade all around the world!! Make
two if you don't want to part with the first one ;)


 Supplies you'll Need:
5 or 6 fabric squares (6.5 x 6.5inches)
2 Buttons
Embroidery Thread
Scissors
Ruler
Needle & Thread
Bone Folder (optional)
Sewing Machine*
*If you're new to sewing, my '
How to Use your Sewing Machine for Beginners' video will introduce you to your machine and help you get comfortable with simple techniques.

We're going to use one of my favorite sewing techniques on this pin cushion... it's an EASY version of quilting where we'll connect pieces of fabric to make stripes :]

Put 2 squares front-to-front and sew a straight line on one side. Unfold and iron the new seam flat.

Trim one of the fabrics about 2 inches wide and connect a new square front-to-front with it. Sew a straight line on one side, unfold and iron the new seam flat. Continue doing this until you have enough stripes that they reach 6" wide.
Note: Try different sized stripes and a fun collection of fabric for the best result! And a few crooked lines are a blessing, they make it look even cooler :)

As you sew on each new piece, keep the bulk of the fabric AND the majority of the stripes to your left... then sew the straight line along the rightside of the new fabric. It sounds tricky but once you get the hang of it, it's very easy :]

Above is an example of an added stripe (in hand), then with the excess fabric removed.

This is the effect you will get :)

Iron flat (i'm a big fan of ironing along the way... it's like the glue of the fabric world!)

Trim any jagged ends into a straight edge. You can also trim the height to 6" tall and cut the width to 6" as well.
Note: If your front seems thin/see-through, you may want to add a liner. Just layer it behind the striped fabric (your pinned fabrics will be layered in this order: 1=liner, 2=striped fabric [goodside facing up], 3=backpiece [goodside facing down])

Chose a piece of fabric for the back that measures 6x6", pin it good side to good side with the striped fabric you just created (i forgot to trim the width to 6" for the photo above, yours will be the same size as your back piece). When pining your squares, leave an 'opening reminder' (mine is the 2 red pins) so that you remember to leave a 2" opening for stuffing the pin cushion.

Start at the opening reminder (backstitch to begin) and sew around the square, ending at the other opening reminder (leaving a 2" opening).

Notice the yellow scissors show the opening. Trim all four corners off without cutting into the stitching. This helps your corners be pointy once it's turned right-side-out.

Use a bone folder to poke the corners from the inside until they look square. Then iron your pin cushion and guide the folds at the opening to sit ready for stitching.

Stuff your pin cushion making sure that there is stuffing in the corners too. For pin cushions, it's good to put lots of stuffing so that it's semi-firm. Using a needle and matching thread, stitch the opening closed with a small blanket or whip stitch (or any stitch you feel comfortable with).

Pick out 2 buttons and a thread that accents the pin cushion nicely :]

We're going to use a button center to take away some of the puffy roundness. Using a long needle and embroidery thread, sew both your buttons on at the same time (one on each side). Notice the harder you pull the thread, the deeper the buttons will set into the pillow. I pulled mine a medium amount, like a sticky twizzler.
Note: Putting a button on both sides of the pillow acts as a 'stopper' so that your stitches do not rip through the fabric. It's also really pretty :)
Tip:
This stitching technique will make things much easier :)
 Congrats! You're done making a pin cushion from scratch!!
I'd love to see your Pin Cushion... you can share pictures in the
Freckled Nest flickr group! :)

 *
Freckled Nest would like to inspire a Worldwide Pin Cushion Swap!
If you'd like to participate in the Pin Cushion Swap:
*
Freckled Nest would like to inspire a Worldwide Pin Cushion Swap!
If you'd like to participate in the Pin Cushion Swap:
Leave your name, email address and location in the comments of
this post.
Courtney and I will pair everyone up and post the swap list THURSDAY. Check back here on Thursday, Feb 4th to discover your swap partner, then contact each other for mailing addresses and to introduce yourself :)
It's really fun and pin cushions are inexpensive to ship, even Worldwide! I've made a pretty yellow pincushion with a Canada button on it for my swap partner... can't wait to meet you! :)
Deadline for Entry: Monday, Feb.1
Deadline for Shipping your Pin Cushion: Sunday, Feb 28
*You can make any style pin cushion, it does not need to be from this tutorial (but that is allowed).
*Please only enter the swap if you'll contact your partner & can participate on time. Thank you.
 Let the games begin!
Love Leigh-Ann
Let the games begin!
Love Leigh-Ann
ps. I have
3 Ad Spots left for February, email FreckledNest@gmail.com if you'd like to reserve one! :)

 Dedicated to Amanda and Tanner :)
I fell in love with Zack in the Miss.Bliss days, grew up with them in the halls of Bayside, I travelled with them to Hawaii, I disliked my boss Mr. Karossi, I cried when Zack and Kelly slow danced outside of the prom cause Kelly couldn't afford her prom dress (what a sweetie, she used her savings to help her disadvantaged family), I wanted to be a Hot Sundae, I got locked in a mall with a bag of money while 2 candid camera thugs hunted for me, I ventured to Las Vegas when Zack and Kelly (my favorite couple) tied the knot.... I never missed an episode or mini movie! Here's some fun Saved by the Bell memories...
Dedicated to Amanda and Tanner :)
I fell in love with Zack in the Miss.Bliss days, grew up with them in the halls of Bayside, I travelled with them to Hawaii, I disliked my boss Mr. Karossi, I cried when Zack and Kelly slow danced outside of the prom cause Kelly couldn't afford her prom dress (what a sweetie, she used her savings to help her disadvantaged family), I wanted to be a Hot Sundae, I got locked in a mall with a bag of money while 2 candid camera thugs hunted for me, I ventured to Las Vegas when Zack and Kelly (my favorite couple) tied the knot.... I never missed an episode or mini movie! Here's some fun Saved by the Bell memories...


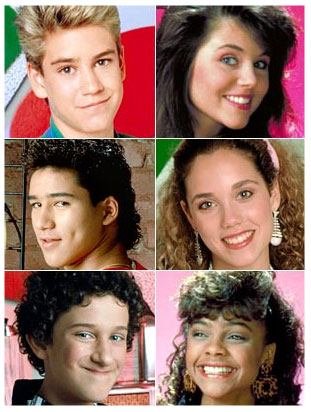


 Now for the big question... which one was your dreamboat, Zach or AC Slater?
 source: zack & ac